This is an old revision of the document!
Timing units
Setting up an event in BBT timing software includes setting up and assigning timing units to timing points. Accurate setup of timing units is essential in getting accurate results.
Adding and maintaining timing units
To add a timing unit to an event start in the 'Timing' mode in the menu to the far left after which you go to the 'Timing units (Setup)' to the far right. A new timing unit can now be added by choosing:
- 'Setup'
- 'Add unit'
- 'Type'
- Choose what timing unit you will be using from the drop down menu
- Type in the IP-address of the timing unit
- 'Add'
It is now possible to assign the timing unit to a location:

- Click on the hand
- Choose from the drop down menu the location where you will using the timing unit. Note: If you have not yet defined the timing locations just choose 'None (unassigned)'. You can always assign a timing unit to a location later in the setup process.
- Press 'Done' when having added the timing units you will be using for the timing of the event
Note: The BBT timing software works with all common open timing units and the list of supported units is constantly being updated. Please contact us if your timing unit is not yet on the list as it most likely can be added.
Using timing units in your event
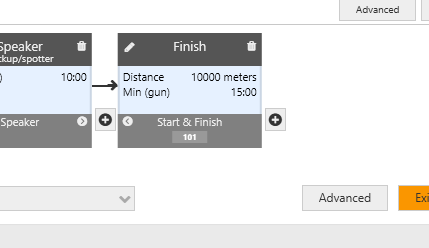
It is now time to link the chosen timing units to the timing pointsFor at benytte dine tidtagnings-bokse, som du har tilføjet i højre side, skal du sørge for at dine timing points er koblet/linket til dine locations, hvor dine bokse ligger i.
- Sørg for at være i “Setup mode”
- Klik på blyanten i venstre hjørne af dit timing point, i dette eksempel “Finish”.
- Ved “Timing unit location” vælger du det korrekte location, i dette tilfælde “Start & Finish”. Du kan oprette andre eller flere locations ude i højre side ved siden af Add units.
- Klik “Save” og du kan nu se, at “Finish” peger på “Start & Finish” location, og tallet fra den sidste del af din ip-adresse på boksen står i bunden.
Connecting
For at connecte til dine timing bokse skal du i venstre side under “Overall status” aktivere “Timing units”:
- Højre klik på “Timing units” og klik “Start connection” eller
- Klik på “Start all” i bunden
Hvis status bliver grøn, er der forbindelse og hvis den bliver rød, er der en eller flere bokse, der ikke kan oprette forbindelse. I så fald kan du i højre side se, hvilke bokse der er røde og har connection issues.
Replaying / rewinding
Hvis du har mistet forbindelse til din timing units, har du mulighed for at replay dine data fra den:
- Nede i højre hjørne klik på “Replay”
- Vælg hvilken timing unit, du ønsker at replaye og i hvilket tidsrum
- Klik “Next” og afvent at systemet replayer dine raw times.
Advanced: Splitting a unit
Hvis du har brug for, at bruge en timing unit til flere timing points på en gang, fx antenne 1-4 er start og 5-8 er mål, kan du gøre det sådan her:
- Klik på “Add unit” for at tilføje en boks.
- Nederst klik “Select specific antennas/active loops only”
- Vælg den eller de porte / loops, du vil assigne til en location.


